Easy deployment of IQRF® with IQRF OS 4.03D
29 October 2018
Smart Connect
This is a new method of adding the Node to the IQRF network.
Properties
- The node does not need to be within the range of the Coordinator but must be within the range of the Node that is already bonded to the network.
- No action is required on the bonded Node side (for example, pressing a button).
- The bonded Node needs to have neither a working channel nor an Access Password of that network set in its configuration.
- Smart Connect is based on system communication encrypted with IBK (Individual Bonding Key). This is the unique and permanent code stored in each TR module during production.
- For the Coordinator to add the Node to the network, it must know its IBK and MID (Module ID).
Smart Connect is implemented in DPA as the new Coordinator periphery command. HWP of a Node supports pushbutton bonding as well as Smart Connect.
In the unbonded state (the red LED flashes on the Node), the Node is in LP reception (low power consumption) and expects the system's Smart Connect packet. If the button is pressed, Node sends the bonding/pre-bonding requests. If the button is not pressed, the Node will go to sleep after about 5 hours. This long period offers time-space for installing Nodes and running the Smart Connect process. This time change is possible in Custom DPA Handler (event BondingButton). Alternatively, sleeping can be entirely disabled by using the Stay awake when not bonded configuration parameter.

Testing the Smart Connect process
You can start the Smart Connect process by the Smart Connect DPA command sent to the coordinator on the Coordinator periphery. The key input parameters are the IBK and MID of the bonded Node, and the required logical address. Both IBK and MID can be detected by application or in IQRF IDE - TR Module Information (Ctrl + M).
Smart Connect command can be tested, like any DPA command, in IQRF IDE via a terminal or more user-friendly via IQMESH Network Manager.
Smart Connect in practice
The input parameters (IBK, MID) can be passed to the Smart Connect process using the so-called IQRF Smart Connect Code. This is an alphanumeric string where the IBK, MID, and HWPID (Hardware Profile ID) of the device are encoded. This code can be generated using the IQRF Code Tool in the IQRF IDE or by a custom application based on available documentation and can be passed in various ways, e.g. using NFC, QR code, etc. The IQRF Code Tool also can also be used to generate QR code.
In practice, Smart Connect can look like this
- In IQRF IDE, a QR code for each TR module (Node) is created and stuck to the device containing this TR module.
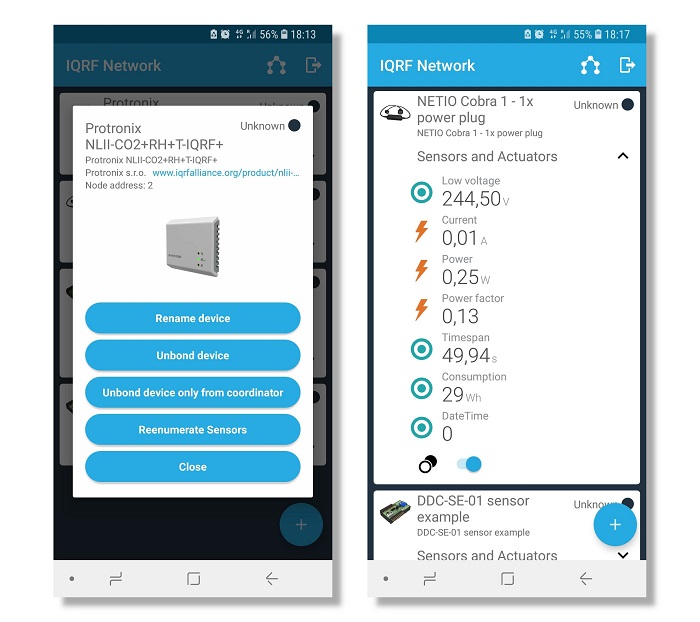
- You place the device in the final place and read its QR code by a mobile application (such as IQRF Network Manager for Android).
- The mobile application is linked to the IQRF Repository and therefore it can find and display information about the device (type, manufacturer, drivers ...) accordingly to HWPID.
- The mobile app will connect via API to the gateway based on the IQRF Gateway Daemon and launches Smart Connect.
IQRF Network Manager for Android
What about the working channel?
From IQRF OS version 4.03D, all types of bonding (Local - e.g. with button, Smart Connect, Autonetwork V2) are running on service channels. Therefore, the bonded Node does not need to have the same working channel pre-configured as the network Coordinator. When installing a network, it is enough to set up a suitable (undisturbed) channel in the Coordinator, and all bonded Nodes will "inherit" this channel and store it automatically in the configuration during the bonding process.
The exception is Remote Bonding - a "pre-bonding" part. Existing Nodes provide pre-bonding in the network, the process takes place in the background, on the working channel of the network, and the Node which should be pre-bonded must have this working channel preconfigured in the configuration.
A user does not need to know the service channel numbers, they are listed in the IQRF OS User's Guide - a channels map.
What about Access Password?
In the case of Smart Connect bonding, the Access Password of the bonded Node does not need to be the same as of Coordinator. The IBK of the Node is used for encryption and authorization.
Other bonding methods (Local - e.g. with a button, Remote, Autonetwork V2) require using the same Access Password.
Access Password is still used for authorization in DPA Service Mode (DSM) and to encrypt/decrypt network backups during the Backup/Restore process for smooth Coordinator/Node replacement in the network (if needed).
Autonetwork v2
This is a new version of an automatic network creation using services deployed directly in the operating system.
Properties
- No Custom DPA Handler is required in the Node.
- In the Coordinator, the Custom DPA Handler required for Autonetwork functionality is uploaded (CustomDpaHandler-Coordinator-AutoNetworkV2-Embedded.c)
- Nodes do not need to have the same working channel as the Coordinator. The channel is "inherited" and automatically saved to the configuration during the Autonetwork process.
- The nodes to be added to the network must have the same Access Password as the Coordinator.
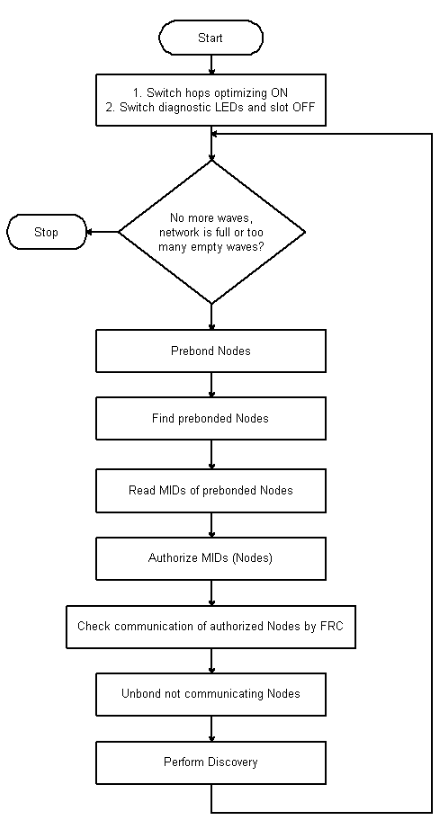
Network creation goes in waves. In each wave, the following steps are made:
- Prebonding (assigning of a temporary address 0xFE),
- Authorization (assignment of a logical address),
- Checking the Nodes (non-communicating Nodes are unbonded from the Coordinator),
- Discovery (detection of a network topology).
In the first wave, Nodes in the direct RF reach of the Coordinator are added to the network. In the next waves, also existing Nodes in the network are involved in the network creation. If no new Node is added during the set number of waves (default value is 2), the Autonetwork process is terminated.
You can start the Autonetwork process with a DPA command sent to the Coordinator, the command is available, for example, in macros (name - Autonetwork embedded - Start).
Autonetwork V2 – process schema


